We’re heading towards SANA testnet at lightning. Here is the SANA testnet release (v0.0.1). The following content will teach you how to run a node in SANA testnet:
STEP 1
Turn on TEE
Amd
Check whether the host machine has SEV features.
When libvirt >= 6.5.0, you can use the ‘virt-host-validate’ command to check whether the host machine supports SEV, or manually check whether it supports SEV through the following steps:
‘grep -w sev /proc/cpuinfo’ check whether the host machine supports SEV
Modify grub to ensure ‘mem_encrypt=on kvm_amd.sev=1,kvm_amd.sev=1’,it can also be configured through modprobe.
$ cat /etc/default/grub
…
GRUB_CMDLINE_LINUX=”… mem_encrypt=on kvm_amd.sev=1"
$ grub2-mkconfig -o /boot/efi/EFI/<distro>/grub.cfg
cat /etc/modprobe.d/sev.conf
options kvm_amd sev=1
View through ‘cat /sys/module/kvm_amd/parameters/sev’, a value of 1 indicates that the SEV is supported.
Inter
Check Your Chip Model
sudo dmidecode | grep CPU
e.g. Version: Intel® Core™ i5–10210UCPU @ 1.60GHz
Enter Intel’s official website and search for your chip model(Intel Website)


As shown in the figure, the chip supports TEE.
Confirm BIOS Setting
First, enter Google to find out what is the BIOS key to enter your computer. Every brand is different. Restart the computer and quickly press the key just found to enter the BIOS interface:
1/ Find Security, choose Secure Boot, and choose Disabled
2/ Find Boot, Start UEFI in Boot Mode.
3/ Find the SGX option, select Enabled first, if not, select Software Controlled. After selecting Software Controlled, enter the following command when you enter the system to start the driver:
wget https://github.com/ethsana/sgx-tools/releases/download/0.1/sgx_enable
sudo chmod +x sgx_enable
sudo ./sgx_enable
Tip
How to open Ubuntu terminal: Right-click on the desktop → Open in Terminal → Run the code and check whether it has SEV features:
ant-linux-amd64 tee
*Currently, only Ubuntu 18.04 / 20.04 are supported.
STEP 2
Install the required environment for Linux, enter the following commands in turn:
Sudo apt-get update
Sudo apt-get install wget

When asked whether to install during the installation process, just type ‘y’ and press Enter. Wait patiently, and it will be executed in sequence.
STEP 3
Create a SANA working folder and enter the following commands in sequence:
Cd /
Mkdir sana
Cd sana
STEP 4
Install SANA network node
wget https://github.com/ethsana/sana/releases/download/v0.0.1/sana-linux-amd64
chmod +x ./sana-linux-amd64
STEP 5
Start node
./sana-linux-amd64 start\
— verbosity 5 \
— swap-endpoint https://goerli.infura.io/v3/xxxxxxxxx \
— debug-api-enable
Notice
The underlined part above needs to be completed in accordance with the following steps to successfully execute the code:
1/ Click the link: https://infura.io/, and register an account.

2/ Sign in your account, and click the button — CREAT NEW PROJECT.
3/ Choose the ‘Görli’ in ENDPOINTS, and you’ll get the link.

4/ Paste the link to the underlined part. Run the complete code and continue the next step.
Set your password after starting

Set a password, confirm the password for the second time to obtain the wallet address.
*Notice
SANA testnet will officially run on Goerli Network, one of the Ethereum testnets.
Your SANA node needs gSANA and ETH (gas fee) to be able to properly interact with the test network. In order to receive these, you will need to go to the faucets to obtain your gSANA and ETH test tokens, using your node’s Ethereum address.
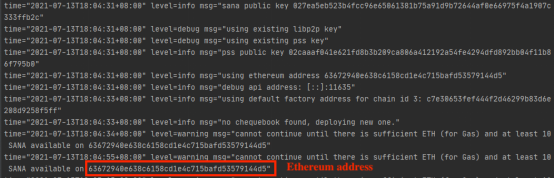
To work out what your node’s Ethereum address is, please consult your relevant installation guide or check your logs!
Faucet
SANA Testnet Authenticated Faucet
Goerli Ethereum Faucet
Media & Community
Website
https://ethsana.org/
Twitter
https://twitter.com/ethereumsana
Medium
https://ethereumsana.medium.com/
Discord
https://discord.gg/c72mpR7Erf
Telegram
https://t.me/ethereumsana
https://t.me/SANA_Announcement